Easy, Low-Cost & Safe Gardening

I’m writing this post with the hope that we will get to plant in Perkins Park Community Garden this summer. It’s still a big IF, and even if we can open, we will likely face significant restrictions and limitations. So I’m taking a few guesses and posting some ideas to help with planning our plots. Or maybe at home you have a patch of sun and space for a 5-gallon container or window box.

Keep it simple. Now is not the time to design complicated garden layouts, especially if this gardening season is your first try. Pick one to a few things you like to grow or eat.  It’s okay to leave open space, but plan to mulch those areas if you can (see below). And know that even if we open up, there’s always a chance we could get shut down again if the pandemic worsens.

Try No- or Low-Dig Gardening. If ever there was a good year to try a more tools-off approach to garden prep, this may be the one, when our tool shed may not be open. See here and here  for the rationale and potential benefits of no-dig gardening.

Mulch.  Last fall, many of us mulched our gardens with leaves and other material, which can be brushed into the areas among new plantings (keep young plant stems clear of mulch). But if your plot is bare, laying down some mulch will save some work later by (1) blocking weeds, (2) improving water retention, (3) building more fertile soil and (4) protecting plants from soil-born diseases. If you use leaves from PPCG and have a tool like a hoe or rake, chop them up a bit so that they don’t form a dense mat that blocks water. Or use corrugated cardboard or brown paper lawn refuse bags/grocery bags, or multiple layers of newspaper. Weight it all down with rocks, jugs of water, etc.. Added bonus: worms love this stuff.

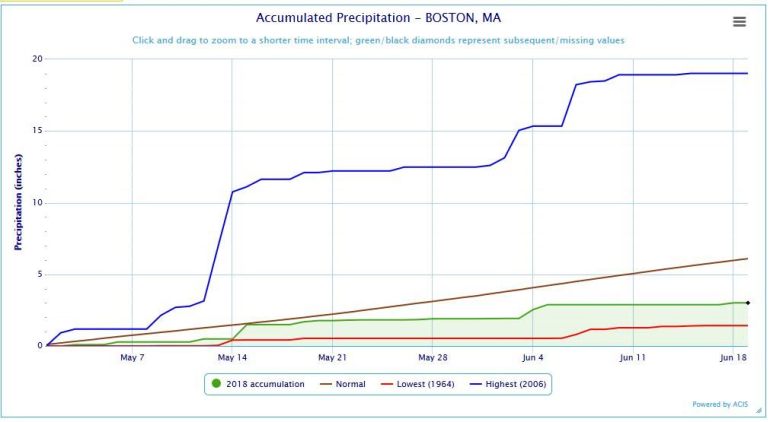
Be Water Wise. We may need to haul our water to the garden, or we may not be able to share hoses and watering cans, so just in case, start saving up those gallon jugs, beverage containers, etc. with caps. (This is one other good reason to keep your garden plan very simple.) Also, once your plants are established, work on watering deeply and less frequently to encourage the development of deep roots and more drought-tolerant plants. See here for more ideas and lists of drought-tolerant plants. And here’s another post on preparing for drought.

Improvise and use what you have and limit your trips out to the stores.

  • Kitchen implements such as serving spoons and forks can work as garden hand tools. Paper grocery bags and newspaper work great as mulch. Milk jugs can act as mini greenhouses or pest protection (just be sure to vent them). Use scraps of old textiles for tying plants. Scavenge fallen branches to support tomatoes and create garden trellises.
  • More garden hacks here and here.
  • Ordering of seeds is delayed at many sites. How about that old packet of seeds? Are they still good? Use them if you can. Test a few seeds out to see if they sprout using this method. DSC_3375
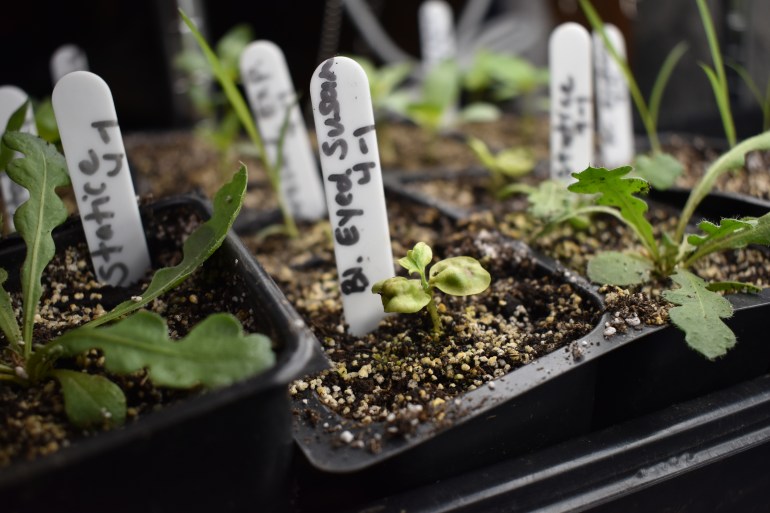
See here, this Black-Eyed Susan vine (front, middle) planted on April 1, now nearly 1.5 months later? It sprouted, but lost its oomph. Poor girl. But many other seeds will do just fine from year to year. More seed-starting tips here.

No-crowd shopping.

  • The Lowe’s parking lot in Weymouth has been almost as crowded as Pond Meadow Park. (Not really, but PMP is unruly these days.) If you must go out and buy anything, try some outdoor garden centers that may be less crowded, such as Christopher’s Garden Shop and Farm Stand (Facebook link) in Weymouth or the Artery Garden Center at 625 Southern Artery in Quincy (in Goodwill parking lot).
  • Non-profit organizations that rely on annual seedling sales are being responsive to the pandemic and are coming up with safe shopping alternatives. See Marshfield, City Natives, and Holy Hill Farm. Stay tuned for Brookwood Farm, which is evaluating its inventory.
  • Does your grocery store or other essential shopping stop sell seeds? A few weeks ago, Kam Man had seed displays filled with a nice selection of Asian greens and other veggies not typically found in the Burpee racks at Home Depot.

Low-fuss planting.

  • It can be hard to start plants from seed at the garden. They need extra watering care until they germinate and as seedlings. There may be pest pressure. Or if we get a big rainstorm, your seeds/seedlings may be washed away. Instead, start seedlings at home for transplant or purchase plants that are ready to be planted out in the garden.
  • Look for F1 or hybrid varieties that are more resistant to diseases than heirloom varieties.
  • Look for quick-maturing varieties. New Girl tomato, for example, matures in 62 days, whereas Grand Marshall takes 78 days. That’s a big difference. (Be aware, too, that in late summer, shade on the southern edge of PPCG grows long and will lengthen your ‘days to maturity.’)
  • Look for easy-to-grow crops. I like this article from High Mowing Seeds, which includes a planting schedule example. One note: zucchini isn’t impossible to grow at PPCG, but we do have some pressure from the dreaded squash vine borer.

It’s almost never too late. Even though we are coming upon the time when we could be planting our second succession of crops (warm-weather crops such as tomatoes, green beans, cucumbers, and peppers), there’s still plenty of time ahead for a third “slot” for planting (quick-growing warm-weather crops and cool weather fall crops).

Hope to see you soon!

In Case of Drought…

For a few weeks now, my favorite meteorologist/horticulturalist Dave Epstein has been tweeting about how dry it’s been. (That rain we had Monday night amounted to barely 1/10 of an inch.) Though the Northeast Regional Climate Center declared the entire northeast drought-free as of May 3, rainfall amounts in Boston have fallen below average for about the past month, which is making me think about (1) how to get our gardens established and healthy now while (2) not wasting any water. (Below, the green line is our cumulative total, up to June 18; the maroon line above it represents “normal.”)

cumulative-precip

I know I’ve mentioned the advice to water less frequently and more deeply, once your plants are beyond the seedling stage. When the surface of your garden soil is kept continually moist through shallow, frequent watering, your plants’ roots are happy enough hanging out where the water is, leaving them susceptible to drying out if you head to the Cape for a weekend.

But if you like numbers as much as I do, you might still be wondering “how much” and “how often” to water.

One inch per week on average is the number I often see. That’s around .62 gallons per square foot of garden per week.

Here’s the rough math…

  • Most of our gardens are 72 square feet, which means we should be giving them around 45 gallons per week. (That sounds like a lot to me, but remember we’re talking about averages here. You may get away with less if your plot is shaded, etc..)
  • It took me 40 seconds to fill a 1.5-gallon watering can using my normal hose setting and pressure. (Your time might be different, depending how you use the hoses.)
  • 45 gallons/1.5 = around 30 watering can fill-ups. At 40 seconds each, that’s 20 minutes of hose time per week. Again, that’s an average amount.
  • You can also try setting tuna cans in multiple locations around your garden and stop watering when they’ve fill to the desired amount.

But there’s more to consider. The soil in New England tends to be sandy and rocky, which means water percolates relatively quickly, beyond our plants’ active root zones, no matter how deep they go. One 20-minute session per week would likely waste a good bit of water and leave your plants dry.

UMass Amherst suggests that watering twice per week should be ample for well-mulched vegetable gardens–for us, about two 10-minute watering sessions–without factoring in rainfall. Or, if you’re using tuna cans, water twice to 1/2-inch.

It takes practice knowing what works well at your particular site/with your particular plants. Every year is different, too. (I’ve been at the same plot for almost ten years, and I’m still figuring it out.)  Though morning or evening watering is best, keep an eye on your plants and go ahead and water right away if your soil is dry and your plants are looking droopy on a hot afternoon. Note that squash and cucumbers will wilt under heat stress.

img_20180619_095133352_hdr

How about rainfall? Here’s our new rain gauge, all nice and level and very empty. For now. When we get rain, we’ll have a better idea of how much water we need to supplement in a given time period.

Old Farmer’s Almanac points out that sometimes the best time to water is right after a rainfall–especially short, light ones–to ensure water penetrates deep.

A few more tips:

  • Compost!  The organic matter in compost will help retain water.
  • Mulch! Use a couple of inches of materials such as straw, shredded bark, chopped-up leaves, seaweed, hulls, newspaper, or compost.  Natural materials, in contrast to plastic mulch, for example, add organic matter. (See above.) Keep it away from the base of your plants to discourage rotting.
  • Keep your gardens weeded. Don’t make your plants compete with weeds for nutrients and water.
  • Consider intensive planting (reducing the spacing between plants, as appropriate) to create shaded cover over your soil. In some sections of my garden, I don’t have room for mulch because the plants are tightly spaced.
  • Old Farmer’s Almanac makes a case for cultivating your soil–roughing it up to help the water soak in. Cultivation may well help in the short term, but in the long term, it may damage your soil structure and lead to more problems with water penetration; also, I’m not sure how well you can cultivate if you’ve applied mulch.

Remember, too, that your plants will need less water as summer moves beyond typical peak water needs in July.

Of course, no matter how carefully you pay attention to amounts and measurements, nothing beats poking a finger down into the soil a couple of inches to see how dry it feels. Is it damp enough to stick together? Try holding off.

Whatever methods work best for you, start planning now. Just in case.


Sources/ More Info…

Food Gardening with Less Water (from the University of California’s UCCE Master Gardener Program, folks with experience dealing with severe water shortages)

A More In-Depth Look at Food Gardening with Less Water (from the same group above)

How Much Water Does My Food Garden Need (again, same group; focuses on the math)

Advice on Efficient Outdoor Watering, from UMass Amherst

Old Farmer’s Almanac tips (includes a chart showing approximate water needs of different types of vegetables)

More tips from Old Farmer’s Almanac

What is evapotranspiration?

Weather data (Northeast Regional Climate Center; I spent way too much time playing with weather charts on this site)

National Weather Service

Braintree’s Water Usage Phases


Getting Started at PPCG (Part 6): Maintaining Your Garden

After you’ve planted, you might be surprised by how much attention your small garden will require, sometimes on a daily basis. You’ll also be surprised by how much it yields if you put in the effort.

Watering

Those baby seedlings and transplants can’t be abandoned; one hot dry day will do them in. Once they’ve been established, you’ll grow healthier, stronger plants by watering less frequently and more deeply, which encourages root growth beyond the surface of the soil. See more Watering Tips.

Mulching

The benefits of using mulch in your garden include:

  • regulating soil temperature
  • maintaining moisture
  • suppressing weeds
  • adding organic matter to your soil
  • protecting crops from soil-born diseases that can be splashed onto your plants when you water

Types of organic mulch include straw, salt hay, wood chips, seaweed, chopped leaves, buckwheat hulls, stubble-harvest-straw-agriculture-158198.jpegand grass clippings. But take note:

  • Leaves can form a matted, water-resistant barrier if they are not chopped or composted first.
  • And thick layers of grass clippings can turn into a stinky, slimy mess.

In addition, some gardeners like using plastic mulch.

Keep the mulch away from the base of your plants. I usually put down mulch in my walking paths first, then fill in with more mulch closer to my plantings as they get established. The goal is to smother weeds, not your plantings.

Last summer, I applied a thick layer of newspaper topped with wood chips. The worms loved it. Most newspaper dyes are okay; check if you’re not sure. The Boston Globe, for example, offers this info. I’ve also heard that lawn refuse bags make great weed barriers.

Gary makes use of free seaweed, collected from beaches. Louise (plot 25) favors buckwheat hulls. And I noticed that Marie (plot 11) uses salt hay.

We do not use the composted leaf mold offered for free by Braintree because we cannot guarantee that the product is free of chemicals and other unwanted matter. For this reason, we’ve started our own leaf compost pile in our garden.

Fertilizing

It’s difficult to talk about fertilizing without knowing your soil, so here’s one more pitch for getting your soil tested. Before throwing down any fertilizer, if you know exactly what your soil needs, you won’t be making blind guesses that can be detrimental to your garden, the environment, and your wallet.

Depending on the needs of my garden at the time, I’ve used products like Garden Tone, composted manure, blood meal, bone meal, kelp meal, and compost from my home composter.

Want more information about organic fertilizers? Here’s a good place to start.

Pests and Diseases

Heads up, gardeners: the deer are active at PPCG this spring.

I’m not sure there’s much we can do to protect ourselves from determined deer because we cannot exclude them with tall fencing around our garden perimeter. In this case, it’s helpful to think more in terms of deterrents and “acceptable losses.” On a more positive note, I will also say that in every year I’ve gardened at PPCG since 2010, I’ve always harvested more than I’ve lost.

In the past, I’ve sprinkled my plants with cayenne pepper and dangled old CDs from

string around the perimeter of my garden. I’ve seen other gardeners use pinwheels. And Louise (plot 25) has covered her lettuce and pea shoots with bird netting (available at Home Depot). If you notice forks growing out of Gary’s plot, it’s because he’s hoping the sharp tines will deter rabbits. With all of these efforts, there’s not much to lose except a little bit of our time.

IMG_20180423_075227139.jpgThis year, I tried inter-planting lettuces with bunching onions and bordering my garden with shallots, leeks, and garlic. Maybe the scent of allium will deter rabbits and deer from chowing down on my lettuce. It’s worth a try, and if nothing else, this particular inter-planting makes good use of space. (Update: the deer did, indeed, skip over my lettuce, but chowed down on a perennial flower and trampled carrot seedlings. I counted myself lucky he didn’t eat the peas and decided, not without pause, to install a fence around my plot. He can still jump over or wiggle under the 4′ plastic mesh–and if he does, he’s going to cause a lot of damage–but at this point, if he gets my plantings, he’s earned them.)

Want some more ideas for deterring wildlife? Try here.

Regarding insect pests and diseases, we have a new gardening resource (stored in the shed) that will help us identify them in our garden. It’s also available here online.

  • Consider using hybrid plants as a front-line defense against common diseases.
  • If you have any diseased plant material, please bag it up and remove it from our site to protect other gardeners.

Specific insect problems at PPCG

  • Vine borers have plagued some of our squash crops.
  • Some of the gardens along the treeline bordering the park have been affected by winter moth caterpillars dropping from the trees overhead. If you garden in one of these spaces with trees favored by this caterpillar, you may want to use row covers over your leafy greens until their season passes. Remember to remove the covers if you have plants that need to be pollinated.
  • In 2017, we also had a localized infestation of earwigs, which the gardeners controlled with a trap (buried bottles filled with oil and soy sauce).
  • If you notice that one or more of your plants looks like it’s been snapped off at the base, you may have cutworms. There’s a simple remedy for cutworms, but you have to act before they do their damage. See the following fact sheet link.

Here’s a good fact sheet with more info on general insect management and here are more fact sheets on specific pests, but please remember that we do not permit synthetic products.

Happy gardening, everyone!


In case you missed it…

Part 1: Organic Gardening and Soil

Part 2: Our Growing Season and Gardening Resources

Part 3: Garden Design

Part 4: Plant Choices and Sources

Part 5: Planting