What in the Devil Is This? Purple Leaf Edition

This spring, a whole flat of marigolds turned purple. So purple, they were almost black.

The marigolds, Durango Outback variety, have been garden stalwarts, the kind I don’t have to fuss with to get good performance. I like their pom-pom blooms, which show up well in dark areas of the garden with only a few hours of daily sun. Normally their leaves are green.

A quick Google search turned up a lot of discussion about purple leaves in tomatoes (see links below), but also plenty about marigolds. I’ve seen discolored leaves on marigolds before, but they look more like the photo here, with reddish-purple around the edges of the leaves. The color is anthocynin, a water-soluble pigment ranging from red-purple to purple-black that develops under a number of different conditions. Sometimes seedlings will tinge with anthocynin for a brief period of time in their stems, for example, as part of their natural development. Or, here, this basil variety will develop purple-red leaves that are normally high in anthocynin. (Younger seedling on left; in this case, I would get concerned if the color didn’t show up purple.)IMG_20200520_090443919

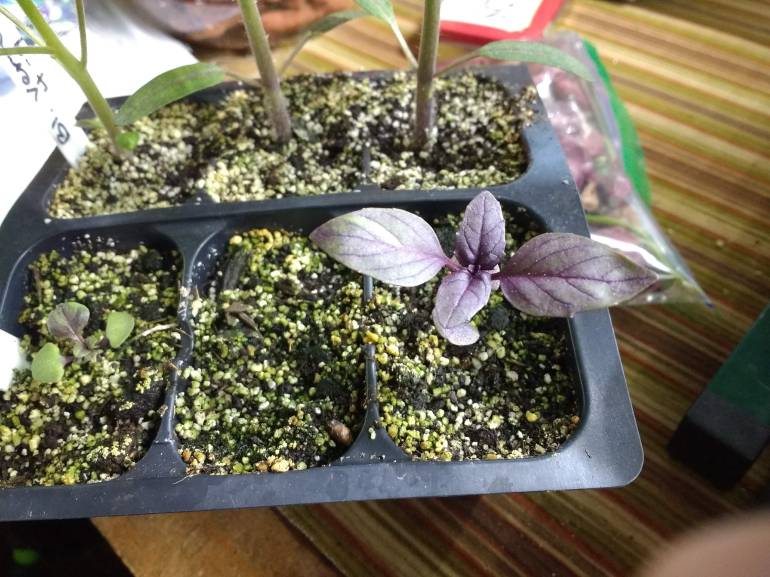
Anthocynin production is also a stress reaction that may help the plant survive a number of adverse environmental conditions, including cold, drought, light stress, and deficiencies in nitrogen, phosphorus, or both.

With regard to my marigolds, I ruled out cold and drought and started with nutrient considerations. Because I’d been growing in a soilless seed-starting mixture (Roots Organics Microgreens) that contains no added fertilizer, I’d supplemented with a liquid 2-3-2 Gardens Alive fertilizer at half-dose once per week. Giving a second half-dose feeding helped a little within a few days, but not much.

Before I gave them another feeding, I considered a third factor: my new lighting, a set of inexpensive shop lights I’d purchased to grow microgreens over the winter. The shop lights had performed well for trays of pea shoots and broccoli, sunflower, and lettuce microgreens. Given that success, I’d figured they’d do at least all right for seedlings, and in fact, most of my other seedlings were fine. (I’d even managed to get some micro tomatoes to flower under them.) Still, I moved half of the marigold seedlings to a full-spectrum grow light and left the other half under the shop lights. Within a few days, here’s what happened.DSC_3327

Shown above, the plants on the left have a few more days under the plant grow lights. I saw enough change within that time to convince me I’d hit on the solution.

Let’s talk a little more about those shop lights, because there’s a lot to know about lighting. For starters, visual perception of light and the specs on most lighting packaging don’t provide enough information for growers. What looks bright to the human eye might not be the right light for a plant at the intensity it needs. Although a whole winter of microgreens grew well under those inexpensive shop lights, crops that are grown simply for seedlings have different requirements from crops that are grown for mature plants. On top of that factor, each crop has a different set of light requirements for optimum mature growth.

IMG_20200602_161709548_BURST000_COVERThe takeaway: inexpensive shop lighting works all right for certain crops, but not for others. I’m sure there’s great variation among shop lighting, as well, and it’s difficult to determine exactly how much/what kind of light plants are receiving without a special light meter. I will continue to use the shop lights for certain crops and give my premium grow light space to those plants that need it.


Sources/ For Further Reading

Gardening Under Lights by Leslie Halleck. Available for free from Hoopla. This is such a great resource, I ordered a hard copy of it.

This gardener’s purple marigold leaves may have resulted from cold temperatures.

Causes of phosphorus deficiency. The fix is more complicated than adding more phosphorus.

Environmental Significance of Anthocyanins in Plant Stress Response.

Abiotic Stresses Induce Different Localizations of Anthocyanins in Arabidopsis.

Causes of tomato leaves purpling.

Brief YouTube video, phosphorus deficiency in tomato plants.

Purple leaf disorder in tomatoes.

Growing Organic Garlic

Recently Jon Belber, Education Director from Holly Hill Farm, joined us at the community garden to share some tips on growing garlic organically.

dsc_1378-2

Many of us in the community garden have already cleared our beds of summer debris and prepped them for winter and/or are still picking kale. But if you’d like to enjoy a garlic harvest next July,  now’s the time (late October through November) to get going on it.

Hardneck vs. Softneck Varieties of Garlic

Hardneck varieties of garlic grow stiff flower stalks known as scapes. They tend to be better suited for cold climates such as ours (Zone 6); in fact, like daffodils and tulips, they require a period of cold dormancy.

Without a stiff flower stalk, softneck varieties remain floppy and can be braided. In general they store for longer periods of time than hardnecks. More info on comparisons here and here.

How to Plant

  • Be choosy about what you plant! You’re more likely to have good results if you purchase garlic bulbs from a reliable source. Most of us don’t have much growing space, so make the most of it and save grocery store garlic for eating.
  • Carefully break the garlic head apart into its individual cloves, trying to keep as much of the papery coating intact. (The paper is its protective seed coat.)
  • Again, be choosy. Don’t plant any soft cloves and select the biggest cloves. The small ones will grow, but won’t be as robust as the garlic plants that start out with more stored resources. Save the little guys for cooking.

    This slideshow requires JavaScript.

  • Following crop rotation practices, it’s better to select a site where Alliums (leeks, shallots, onions, etc.) did not grow in the previous few years.
  • Prepare your garden bed by loosening the very top layer of soil and laying down some compost. There’s no need to do a lot of digging and disrupting of the soil structure in your garden unless it’s hard and compacted.
  • Where you are planting your garlic, run a shallow trough around twice the depth of your garlic cloves.
  • Tuck in the cloves with pointy tips up about 5 – 6 inches apart in the trough. Garlic cloves planted upside down will still grow, but they’ll have to spend extra energy orienting toward the soil surface, and you’ll end up with a garlic plant that looks like the one below.
  • Cover with soil.
  • Top with a generous few inches of mulching materials, such as shredded leaves or straw.

    dsc_1393-2
    When using leaves as mulch, make sure they’re composted or shredded as above; otherwise, they can form a dense matted layer.
  • Green tips may emerge above ground around February. (Sometimes this growth appears in late autumn and then stalls; generally the plant will not be adversely affected, though the growth may whither and lose its green color in freezing temperatures.)

During the Growing Season

  • Around June, hardneck varieties of garlic produce curly flower stalks known as
    img_20180620_140043409
    If allowed to grow, garlic scapes curl, swoop, and flower. Too beautiful to cut? Enjoy them in a floral arrangement.

    scapes that should be removed to allow the plant to send more energy down to the bulb. Cut off this part when it starts to curl, but don’t throw them away–the scapes can be used to make a pesto, cooked and used for mild garlic flavoring, or even added to floral arrangements. More cooking ideas here.

  • Pull the garlic plants around July 15 . You can eat them right away if you enjoy assertive garlic flavor. Or cure them in a warm dry place with good air circulation, away from direct sun.  When the neck is dry and the skin papery (in about 2 – 3 weeks), they can be stored in a cool, dry, well-ventilated place (not the refrigerator). Different varieties of garlic will hold for varying lengths of time.
  • Make use of the space where you harvested your garlic by digging in some compost and planting a succession crop such as quickly-maturing carrots or green beans.

Mail-Order and Local Sources

Holly Hill Farm purchases their garlic from Fedco SeedsJohnny’s Selected Seeds is another reliable source for types that grow well in New England. At the end of October, it’s too late to purchase garlic bulbs from most mail-order sources; still, it’s worth checking out these sites now simply as a reference. Plan ahead for next fall; these sources can run out early, well before planting time.

But there are still options right now. I had good success last summer with the garlic I purchased from the organic grower at Braintree’s farmer’s market. (There’s one more market day scheduled on Nov. 17.) Hingham Farmer’s Market is still running weekly. And Holly Hill Farm is hosting a garlic festival on Nov. 3, 2018, where garlic will be available for sale and farmers will be on hand to run garlic-planting demonstrations.

How’d It Grow? The Cucamelon

After hearing a few gardening friends from different circles talk about cucamelons , I decided to give them a try this year for the first time.

Cucamelons–also called Mexican Sour Gherkins and Mouse Melons–resemble tiny watermelons. “Vines start growing slowly,” notes Johnny’s Selected Seeds, and, “Not particularly high-yielding.”

After planting the seeds in early June, I waited for a few weeks and assumed they’d washed away before I saw any sign of them. The emerging seedlings remained tiny for another few weeks. Some just disappeared, likely eaten as a snack by a couple of flea beetles. The vines that survived grew so slowly that all nearby plants outpaced them, shading them and further hindering their growth.

Around early August or so, I finally started seeing tiny yellow flowers.

dsc_0835-2

And by the time the fruit appeared, something else had already happened in my garden.

A cucumber explosion.

Evidently it was a banner year for cucumbers here in our area, based on the number of people at the garden talking about their great cucumber harvest. Which is great, of course. Only by the time the cucamelons finally made their entrance, I was already on the third act of cucumbers: canning and preserving.

dsc_0888-2

But here they are, like fairy watermelons, alongside a cherry tomato and a scarlet runner bean for comparison.

dsc_0763

Per Johnny’s instructions, I picked them when they were small, a little less than one inch. (Longer ones get seedy). Once the plants built up steam, they stretched out, clambering up the trellis and across the tops of my tall flowers. Cucamelons were tucked in all corners, though not in high numbers and not obvious among the foliage. I had to forage for them.

Their flavor? Like a slightly sour cucumber, lemony. Nicely crunchy. Their skin is a little thick. Sliced in half lengthwise, they’d probably make a nice addition to a fresh salad that I’ll be craving mid-winter. Or if I’d had enough at once, they might have made a nice jar of pickles.

A few takeaways…

  1. Given the slow start of summer in zone 6, I wouldn’t plant them any earlier here than I did, in the beginning of June. Even then, nights can still be quite chilly.
  2. I recommend protecting them under a row cover or cloche for a little extra warmth and insect defense.
  3. Just in time (hello, Frost), I’ve learned that cucamelons produce tubers that can be overwintered, which hopefully will mean a more vigorous start next season.
  4. Think carefully about space planning. The rest of your garden will travel into the future while your cucamelons stall in their own space-time dimension. They won’t grow well in the shade of other quickly-maturing plants.
  5. The cucamelon is no way to pad your harvest. It’s not like a hybrid cherry tomato, cheerfully producing early, across the full season, and in spite of disease pressure while you’re waiting for your heirlooms to come in. You may very well be weary of anything cucurbit-y by the time these guys produce.
  6. Is the novelty worth it? Maybe, and I’m willing to give it another try now that I understand more about its growing habit. I could see this plant working well in a garden where there’s not enough space for a full-sized cucumber beast. The cucamelon’s leaves and fruit are small and lightweight, unlikely to overwhelm surrounding plants if you don’t mind a little disarray and let a couple of vines ramble and find their way in the sun. Keep some sunshine carved out for it among your other plants,  and it may perform better than mine did.